Home

Showing posts with label ironing. Show all posts

Wednesday, April 19, 2017

My New Reliable Velocity Iron

This is my old Reliable Velocity iron. It has been reliable but after 5 years I have worn it out. It is not worth repairing, the cost of which would include having to ship it both ways across the country. It is no longer made and has been replaced by an updated model.

This is my new Reliable Velocity iron. I am hoping it has kept the best features of the older model and improved on others.

New on the right. There are a lot more and smaller steam holes. The grooves that shot the steam along the sole plate have gone. It will be hard to compare if the new is more effective but here's hoping.
The top point is pointier - a good feature for detail work but I use this iron mainly for flat yardage. The back is curvier which makes it harder to tell when the straight edge of the fabric is covered with the sole plate.

New on the right. The main difference is the push button digital readout has gone. This was the feature that failed on the older model. My resident engineer says it would have been very difficult to keep the electronics sealed away from the steam chamber. The temperature is now controlled by a manual dial.
The water sprayer has gone. That is OK because I didn't use this feature. The steam-generating chamber produced enough steam to smooth out the driest and most wrinkled fabrics.
The new model has a clearer plastic water chamber so it is easier to see the water level. As a consequence, I don't overfill it as often. 

New on the right. The water filter (bottom left on the older model) has gone. With a steam generator, the water quality can affect its lifespan and efficiency. I am filling the new iron with only distilled water to avoid the buildup of scale and rust in the chamber. Even though the shop I bought the first iron from told me it was OK to leave water in the chamber all of the time, I now empty it at the end of each session. It will make a difference in prolonging the life of the iron.

New on the right. The water fillers illustrate the newer model has a smaller water chamber holding about a third less water. I consider this a negative feature because it means I have to refill it more often. 


I poured water from the old container into the newer iron and this is the leftover water. I don't know if you can see the water line here.

After a short time using the new iron I found another negative feature. I kept naturally putting my hand forward of the rubber handle and unintentionally pushing the buttons with my palms. I found it was easy to bump the circular dial to a different setting. At first, I thought this heavy iron, which I like the weight of, was unbalanced in that my hand went to the centre point and covered the buttons.

 Then I noticed when I kept my hand back away from the buttons my fingers were scrunched against the back of the handle. I have decided the handle design was too short.
I really like that this iron is so heavy. It does a great job without my having to put any weight on the handle. All I need to do is guide it with my hand. 
When ironing I aim to keep the iron down and in contact with the cloth as much as possible and to lift it only when I need to move the fabric. By using the weight of the iron and its feature of being able to continuously produce steam I can get a lot of ironing done relatively quickly for little effort on my part. This is the main reason why I bought this brand again. I am hoping its modifications and my better care of it will ensure we have a long and happy life together.

What is your favourite iron? I would be interested to hear from you.

Wednesday, October 12, 2016

'Earth Repair' - 3 Years Later

2014
3 years 3 months after the emergency while living outside wrapped around the Indian plum I brought the 3 afternoon tea cloths inside. 
They were carefully washed, dried and ironed. I was hoping the laundering had stopped the decay processes.

There is much staining and decay and large holes had appeared.
How to preserve this cloth? The usual way to repair a cloth is to darn it but the whole cloth is in such a fragile state didn't think it would support darning. Another way to repair cloth is to add a patch. When I thought about it, adding patches is the way the soil is repaired each year. Leaves fall from plants and trees and cover the soil. Organic processes work on breaking down the leaves to return them to the soil.

I was thinking about this soil repair idea when while out on a walk I noticed the Tulip tree had a skirt of leaves reflecting the shape if its branches. It was using its leaves to replenish the soil it grows in.

I looked more closely at those fallen leaves and saw the majority had decayed in such a way that only the veins were left. They were leaf skeletons.

I collected them up and soaked them in water to remove the soil and pine needles.

I left them to dry.

They are quite lovely in their fragile state. I had this idea to repair the tea cloth with these fragile leaves. I hand stitched leaves directly onto the cloth over the holes. At the top of the cloth I stitched a row of eyelets, wove a jute string through them and inserted a stick I found near the Tulip Tree. 
The cloth hung on my design wall for the year, still too delicate to do anything with.

2015
When the Tulip tree was dropping its leaves again the next year made me look again at the still fragile afternoon tea cloth.
I wanted to add more leaves but I wanted to make the skeletons stronger while still appearing fragile. It was time to sample. I coated leaves with various mediums but they tended to fill the holes and look a bit shiny. I ironed on a fine fusible web. I liked the look.  

I added the bonded leaves but I couldn't iron them in place. I decided to machine sew them in place using the finest thread I had with the finest needle.  I liked what was happening and decided to add another layer of leaf skeletons next fall.

 
2016
I added another layer of bonded leaves using a combination of hand and machine stitching.
The cloth with its leaves was stronger looking but getting very dried out and brittle. I added a thin layer of liquid Min Wax. I thought this last effort had ruined the whole thing. It was shiny and stinky and ugly. I just left it hanging thinking I would throw it away when I got around to it.
But one day it caught my eye because it had taken on a transparent glow and the layers of leaves were more visible giving an interesting depth. And it wasn't stinky anymore. 
I was going to add yet another layer of leaves until it got accepted into the World of Threads Festival. Once our work is accepted we have to promise the work shipped will be exactly the same as the images we sent in with the application. 
I can add the next layer of leaves after it returns home.

PS This is what the Indian plum tree looks like fall 2016
Still alive...

...but the bark doesn't look very healthy where the deer ate it.

The fungus growth on the middle trunk indicates the tree is dying.
Maybe the deer knew the tree was old and on its way out.


Friday, April 29, 2016

Carol Soderlund's Dyeing technique

Last year I attended one of Carol Soderlund's workshops and learnt how to dye neutral colours using Procion MX.
She also taught us her dye technique that I have since been able to set up in my studio.
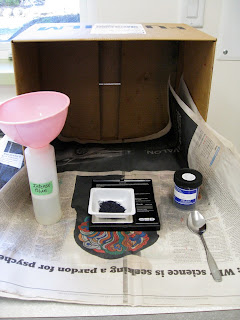
This is the set-up for weighing dye powder to make the stock solution - cardboard box, newspaper, spray bottle full of water (not shown), face mask (not shown), fresh dye powder from Pro Chem, scale from Amazon.


Dye Station
Dye weighing and stock solutions behind, dye mixing and dye application in front. 
This set up is to make colour samples. I would move the dye application to a larger table to dye yardage.

Batching
 Dye samples on plastic covered tables overnight to 24 hours plus.

Rinsing 
Keeping light and dark fabrics separate the excess dye is washed out under cold running water in the right-hand sink. Then the fabric is put into fresh, cold water without being crowded, on the left side.

Filling the stock pot from the instant hot water tap, kept at just below boiling temperature.

Setting the Dye
The pot is put on an induction hot plate. The temperature is set at boiling and timer for 10 minutes.
After the fabric has been boiled it is transferred to the spinner where excess water is spun out and drained out into the sink.

Polishing
I like to steam iron damp fabric dry. In laundry jargon, it is called polishing. 
I use a Reliable brand, heavy iron that produces a lot of steam.

The rectangle shaped ironing board is ideal for ironing yardage but there is a weakness in the design. When working at the left end of the board it tends to tip. My solution is a counter-weight at the other end - a lovely piece of granite that turned up when earthworks were going on for the Backyard project.
This dyeing set up is simple, flexible and works so well. I am very grateful to Carol for so generously sharing what she has learnt over years of experimentation to understand the fine details of the dyeing process.

Friday, November 20, 2015

Making Mola Pillows working at the Ironing and Cutting Centres


While making the mola pillows, I worked at 2 more centres in my studio.

The Ironing Centre
The ironing board has an extension to make it a rectangular shape better suited to ironing lengths of cloth. I have 2 irons a steam iron and a dry iron.


The power outlets for the irons and the sewing machine were put into the floor to keep the cords from crossing the work surfaces.

The rack under the ironing surface holds a variety of pressing clothes, water sprayers and spray starch.

The Cutting Centre
After the mola had been steamed I walked a couple of steps to the cutting centre. 
It sits in the middle of the area where I can move around all 4 sides while cutting. It saves on the number of times the fabric has to be repositioned.

The left-over cork floor tiles on the left I thought would make a useful cutting surface when using the Exacto knife but the cutting rulers bumped up against the tiles so they had to go.

I moved them across the walkway to the drawing centre.
After a minor adjustment, I found the Ironing Centre and the Cutting Centre work fine.


Tuesday, October 13, 2015

Studio Footwear and Laundry Centre

I received lots of comments and questions about my choice of Studio Footwear, as seen in this previous blog post.To answer you all, here are the details.
Outside: (Left) Suede, Danish-style clog. Brand - 'Simple'. The best feature is when I step in soft soil the heel print says 'past' while the toe part has a forward pointing arrow and says 'future.'
Inside, winter: (Middle) Shearling sheepskin suede, backless moccasin. Brand - Nuknuuk.
Inside, summer: (Right) Thong/jandle/flip flop with moulded sole and cloth straps. Brand: 'Axign'. (Thank you sister for putting me onto these. And for letting me wear yours until you took me shopping to get my own pair.)
All are easy to slip on and off as I move in and out of the studio.
So there you have it.
Now to the Laundry Centre.

Regular laundering of cloth I will continue to do in the house.
Wash-out of dyed cloth I will do in the studio, beginning with the cold rinse in the big, deep tubs.

Since learning about Carol Soderlund's wash-out method, the next step will be to simmer the cloth in a stock pot filled from the instant boiling water tank.

Out of the cupboard under the tubs I will lift out the spin dryer...


... and set the outlet spout over the tub. I put the cloth in the top, plug it in and away it goes, spinning out all excess water into the tub.
It is one of those appliances with lots of names all over it - The Laundry Alternative Inc., Nina Soft, Mueller Electrodomesticos (the best name). They also make/sell? a small, bullet shaped manually operated washing machine - appliances for those who live in small spaces.

After the spin, I will steam-iron cellulose fibres dry, a technique known as polishing. Protein fibres such as silk and wool I will dry on a rack in the shade before lightly steaming them.
This is the studio laundry process. 
I didn't want 2 big machines when there is a set in the house. I didn't want to make the studio plumbing more complicated than a single tub area. And I didn't want to take up valuable studio space with machines at the expense of the horizontal work surfaces.
I'll keep you posted on how this laundry system works out.


Monday, May 26, 2014

Busy Weekend

Each day I have continued to repair the bead work on this dress.

The weekend started out warm and breezy - perfect conditions for laundering my collection of domestic linens, acquired over the winter.

Outside in the breeze until damp dry.

Then "polishing" with a steam iron.
This process took 2 days!

Sunday, October 6, 2013

Doing Laundry


Over the summer I had several sessions doing laundry while it was hot and dry
- perfect conditions for cotton.

I soaked and washed a pile of domestic linens I had accumulated.
I hung them to dry until they were just damp.

Then steamed them dry and smooth.

They were added to my collection...

...waiting until their time out in the public eye. 
Posted by Picasa